
EU Legal Guarantee Notice & GARAN Label. From 27 September 2026 traders selling goods to consumers in the European Union must inform them about the legal guarantee of conformity with a harmonised notice, and show a harmonised label (GARAN) when the producer offers a commercial guarantee of durability longer than two years. Both formats are set by Directive (EU) 2024/825 and Commission Implementing Regulation (EU) 2025/1960.
🛒 Buy the module · Try the demo
This module shows the official files published by the European Commission, unchanged, in the 24 official EU languages: on the product page, in the cart, in the payment step before the order is placed (at the top of the step or directly above the order button), in the footer, on a dedicated page and in the order confirmation email. It also draws the GARAN label of each product from the official template.
This guide describes version 1.2.6. Besides the notice and the label, the module lets you enter the GARAN data once per manufacturer, import and export it as CSV, set it per combination, hide the blocks from business customers, keep a record of what each customer was shown with every order, choose the look and the position of the label and of the notice on the product page, and check your product texts with a scanner.
1. Installation
- In the back office go to Modules → Module Manager → Upload a module and select the module ZIP.
- Once installed, click Configure and then Go to configuration. The settings are also in the menu Modules → Legal guarantee (EU).
Right after the installation the notice is already active: a compact block on the product page, in the cart and in the payment step, a link in the footer, and the notice in the order confirmation email. No GARAN label is shown until you fill it in on a product.
.local, .test, localhost) are always allowed. When a new version is available it is shown right inside the module.2. Configuration · step by step
At the top of the module page there are seven tabs:
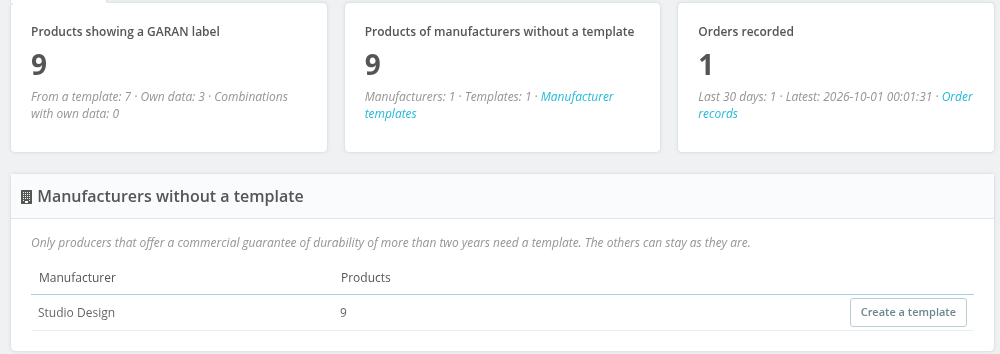
- Summary: the overview. How many products show a GARAN label and where the data comes from (manufacturer template or own data), the manufacturers still without a template, and the orders recorded.
- Settings: where the notice is shown, the confirmation email, business customers and the order records (this section).
- Appearance and positions: form, look and position of the label and of the notice on the product page (section 7).
- Manufacturer templates: the GARAN data once per manufacturer (section 4).
- CSV import and export (section 5).
- Order records (section 10).
- Text scanner (section 11).
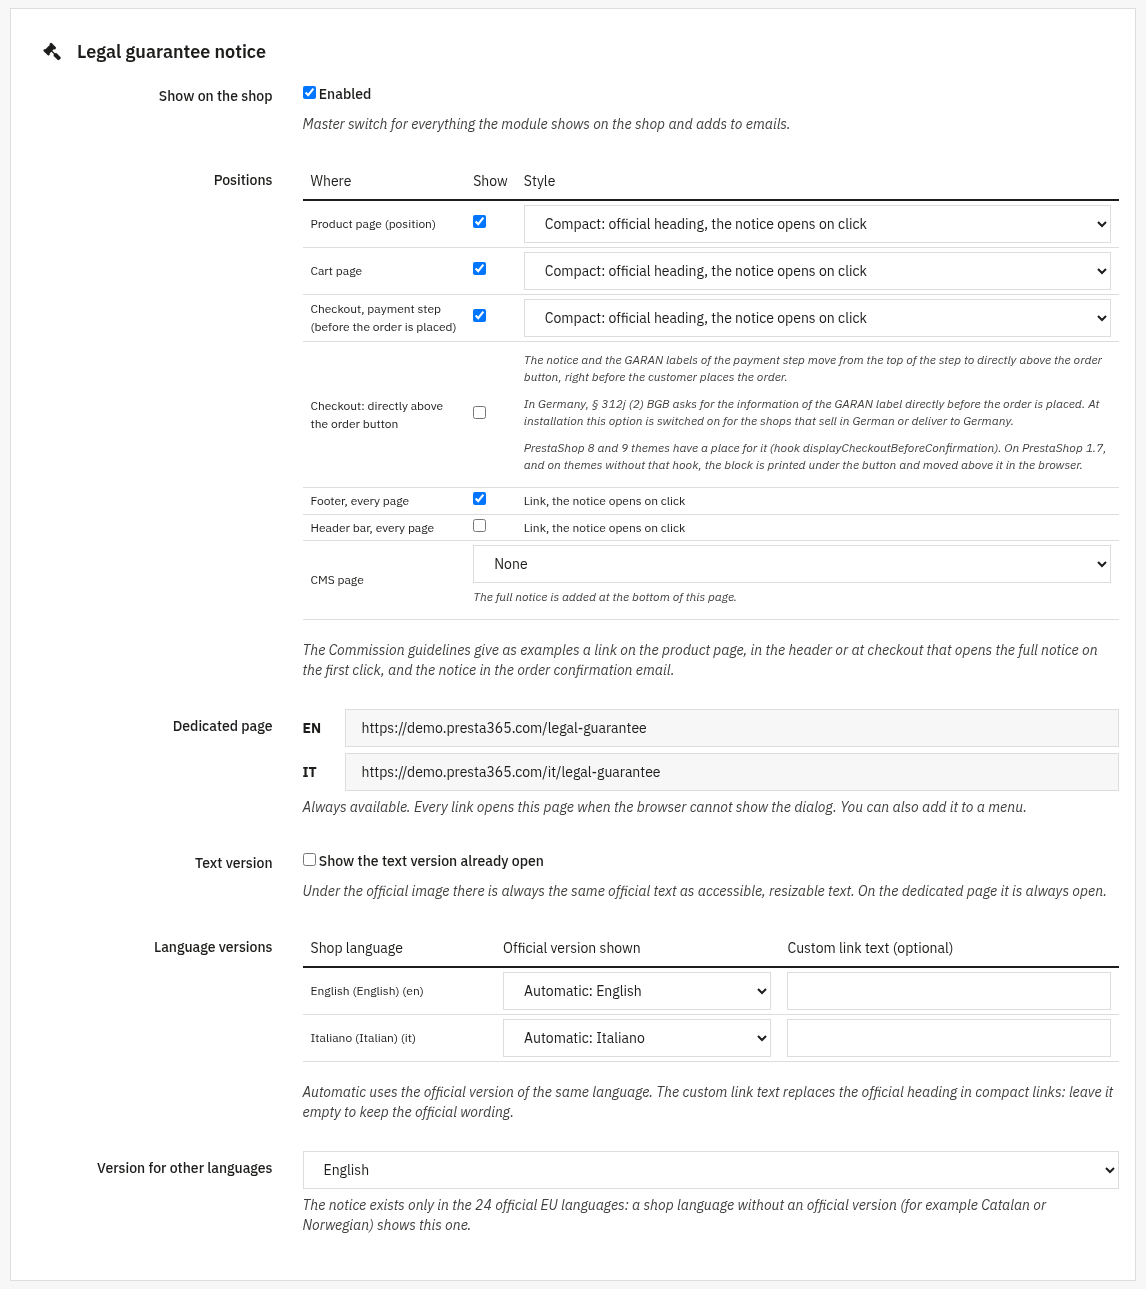
Legal guarantee notice
- Show on the shop: the master switch for everything the module shows on the shop and adds to emails.
- Positions: product page, cart page and payment step, each with its style. Compact shows the official heading of the notice: one click opens the full notice in a window. Extended shows the full notice in the page.
- Checkout: directly above the order button: the notice and the GARAN labels of the payment step move from the top of the step to directly above the button that places the order. In Germany, § 312j (2) BGB asks for the information of the GARAN label directly before the order is placed: at installation the option is switched on for the shops that sell in German or deliver to Germany. PrestaShop 8 and 9 themes have a place for it; on PrestaShop 1.7, and on themes without that place, the block is printed under the button and moved above it in the browser. When the option is on and your theme calls neither
displayCheckoutBeforeConfirmationnordisplayPaymentByBinaries, a warning under the option tells you: the module then prints the blocks at the end of the page and moves them above the button in the browser, so check the payment step of your shop. If the theme does not calldisplayBeforeBodyClosingTageither, nothing is shown in the payment step while the option is on: switch it off to show the blocks at the top of the step. On a multistore installation, in the context of all shops or of a group, a warning names the shops and groups of shops that have their own value for this option. - Footer and header bar: a link on every page that opens the notice.
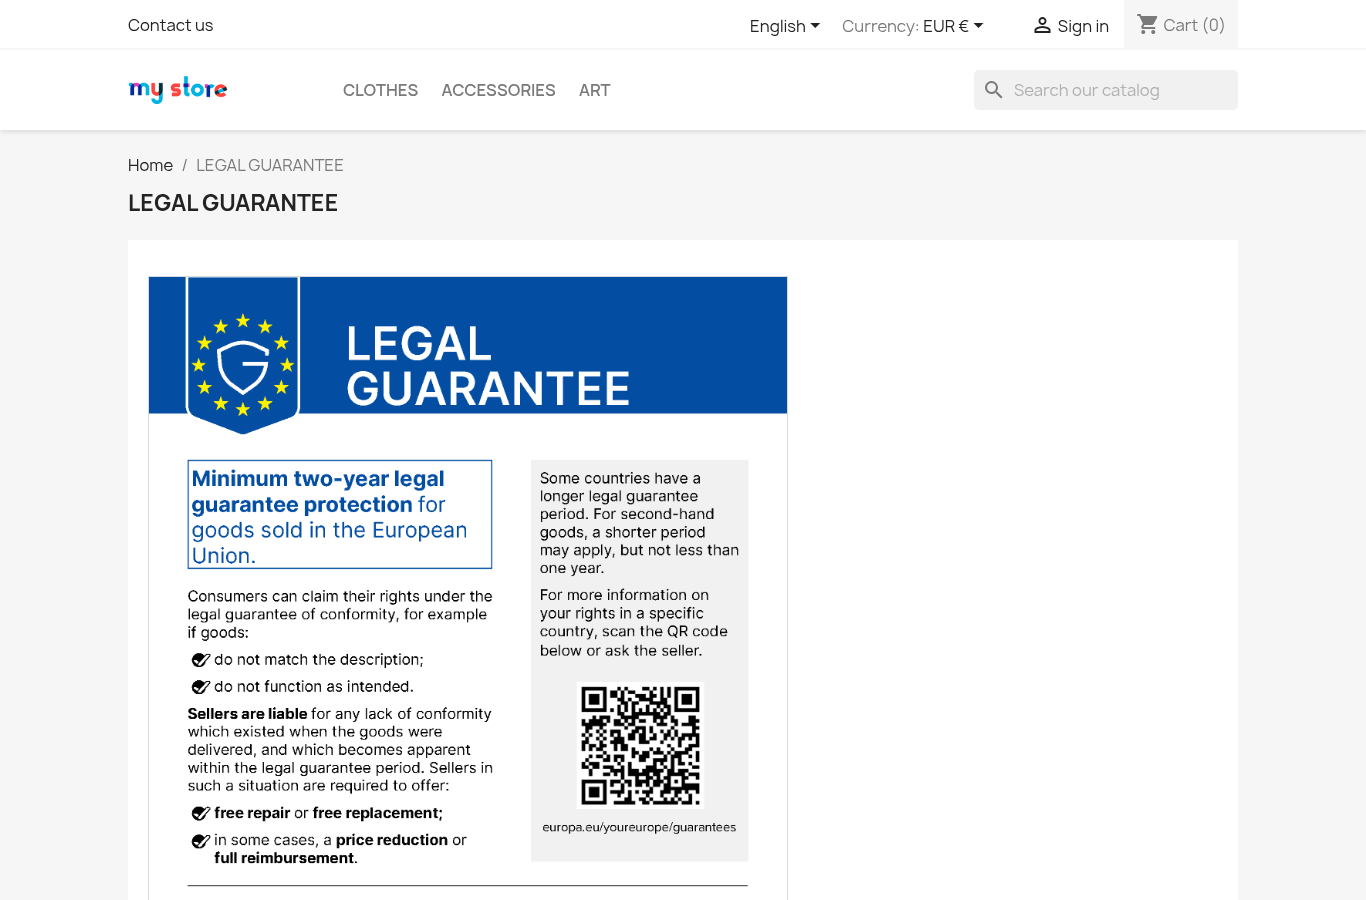
- CMS page: choose a page (for example your terms of sale) and the full notice is added at its bottom.
- Dedicated page: always available, one address per language (for example
/en/legal-guarantee). You can add it to a menu. Every link falls back to this page when the browser cannot open the window. - Text version: under the official image there is always the same official text as real, resizable text, for screen readers and small screens. You can show it already open.
- Language versions: each shop language shows the official version of the same language automatically. You can choose another version for a language, and replace the heading of the compact link with your own words.
- Version for other languages: the notice exists only in the 24 official EU languages. A shop language without an official version (for example Catalan or Norwegian) shows the one chosen here.
Order confirmation email, GARAN label and data
- Add the notice: the notice image, the link to the Your Europe page and the full text are added at the end of the email, in the language of the order.
- Email templates:
order_confis the order confirmation sent by PrestaShop. You can add other templates, separated by commas. - Attachments: the official PDF of the notice and the GARAN label images of the ordered products can be attached, so the customer keeps a copy that does not depend on images loaded from your shop.
- GARAN labels: switches the GARAN labels on or off. Form, position and look of the label on the product page are chosen in the Appearance and positions tab (section 7); here you choose whether to show them also in the cart and in the payment step, directly before the order is placed.
- Uninstall: the GARAN data of products and combinations, the manufacturer templates and the order records are kept when you uninstall, unless you tick the delete option: in that case they are deleted and cannot be recovered, so export the order records first.
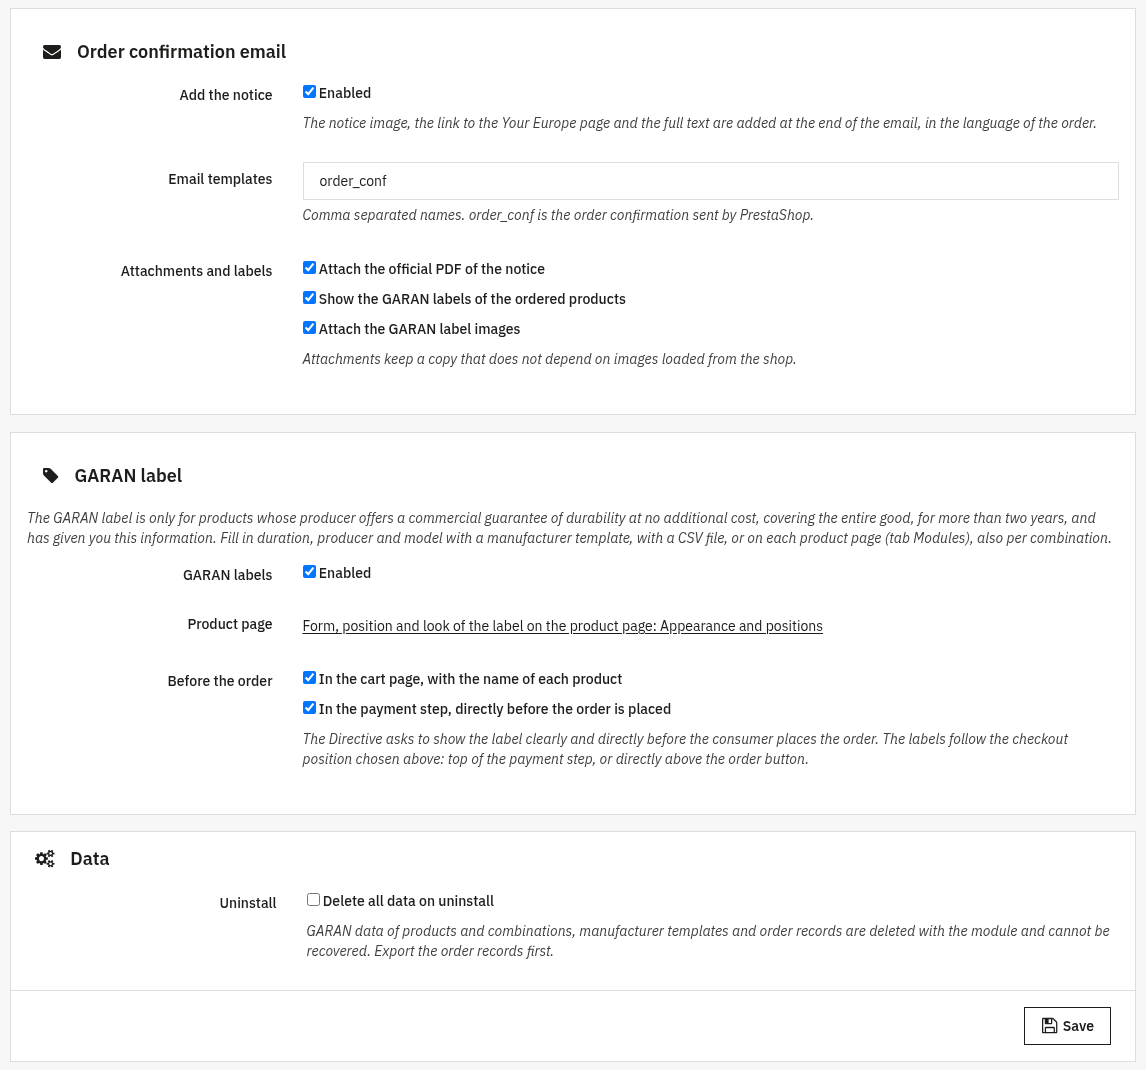
Click Save to apply your changes. On a multistore installation the settings follow the shop context selected in the back office.
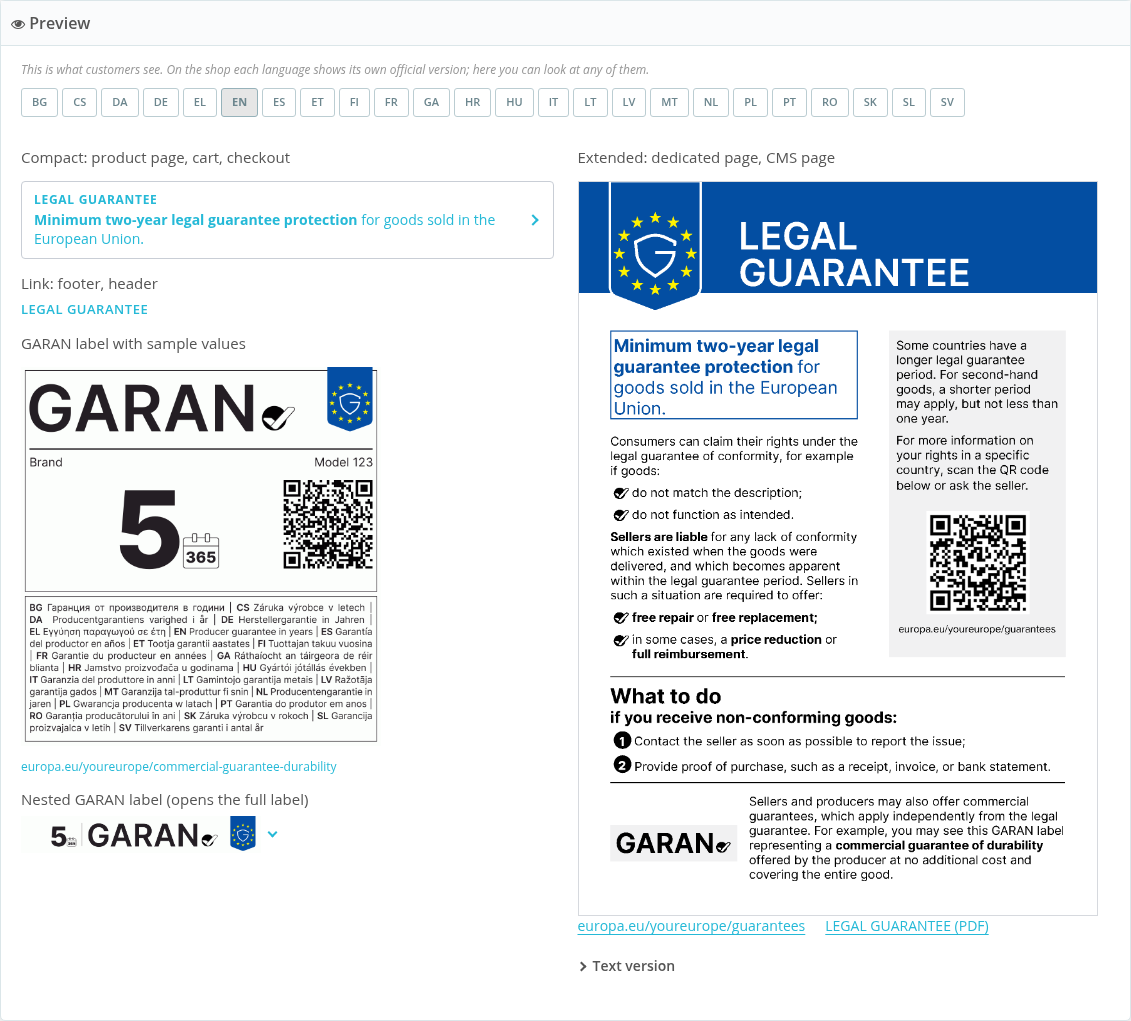
Preview in the 24 languages
At the bottom of the settings page the preview shows every display (compact block, link, GARAN label with sample values, nested label, full notice). Pick any of the 24 official languages to check it before your customers see it. The panel above the preview lists the products that already have a GARAN label, with a link to edit each one.
3. GARAN label on a product
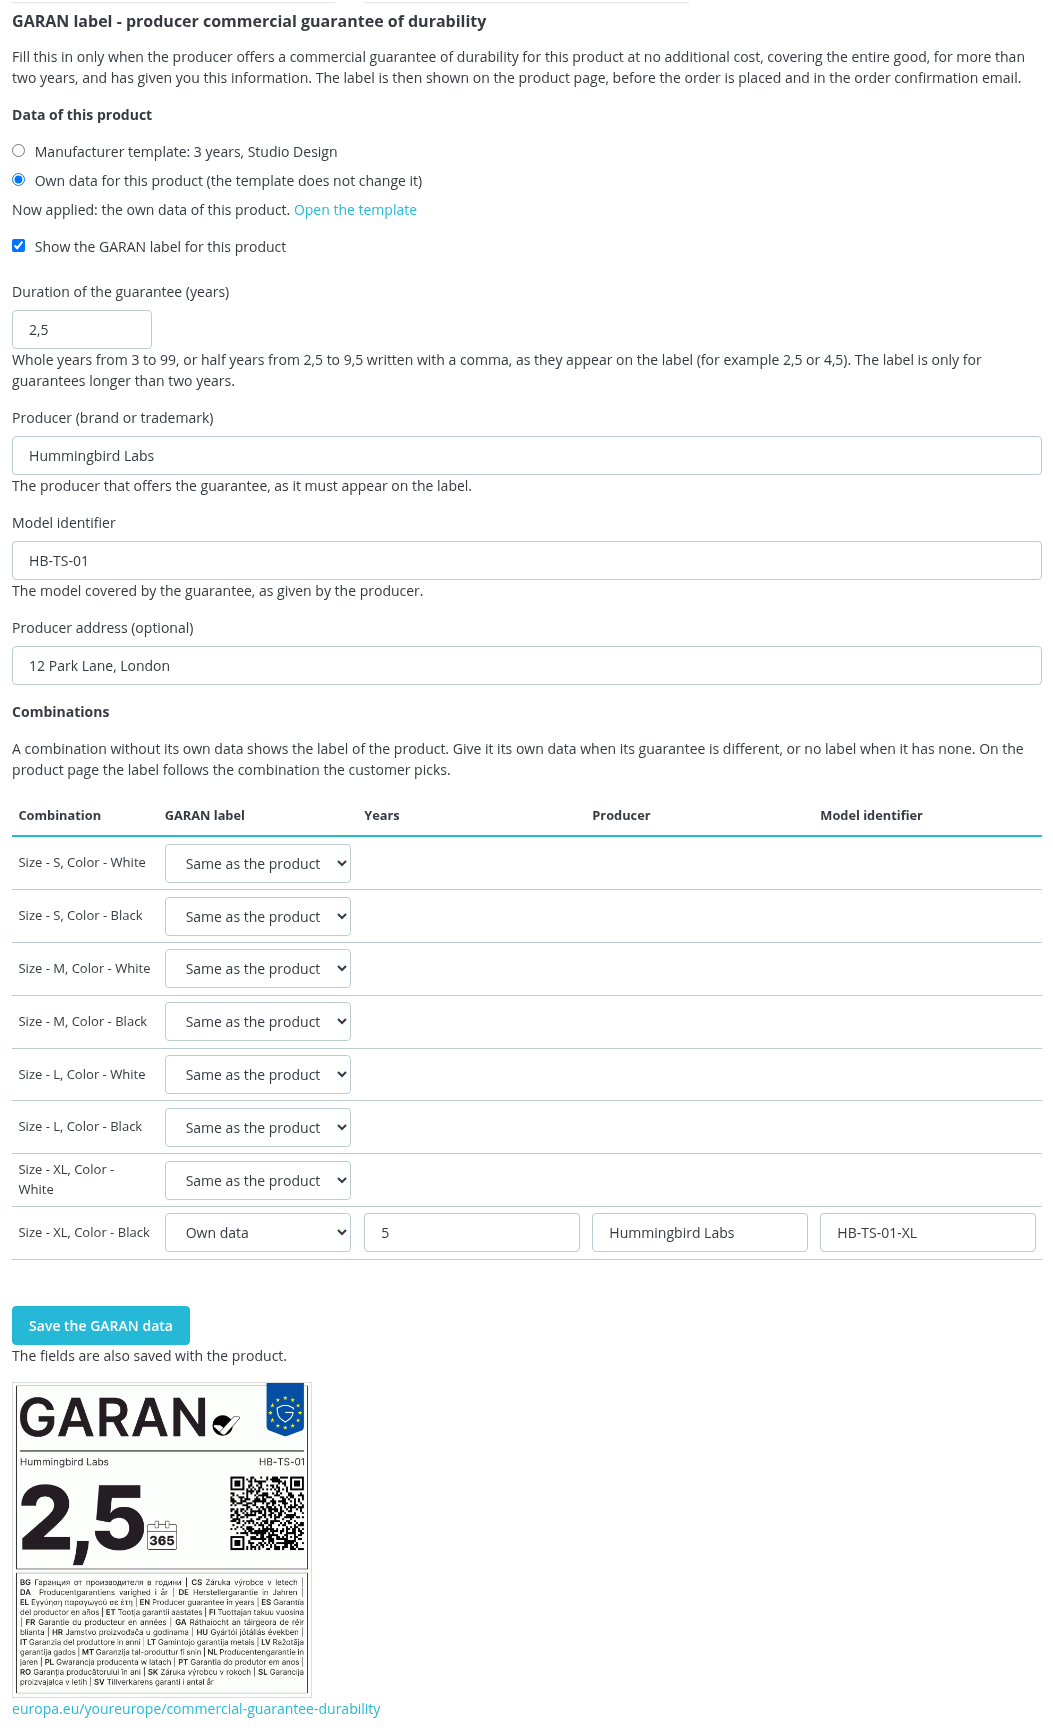
Fill in the label only when the producer offers a commercial guarantee of durability at no additional cost, covering the entire good, for more than two years, and has given you this information. Open the product in the back office, tab Modules, panel GARAN label:
- Show the GARAN label for this product.
- Duration of the guarantee: whole years from 3 to 99, or half years from 2,5 to 9,5. Write half years with a comma, as they appear on the label (for example 2,5 or 4,5): the Commission guidelines allow half years and no other decimals.
- Producer (brand or trademark) and Model identifier, as given by the producer. They are prefilled with the brand and the MPN or reference of the product when available.
Click Save the GARAN data (the fields are also saved with the product). The label is drawn from the official template with the prescribed font and shown under the fields. If the producer name and the model identifier are too long to fit on the line of the label, the module asks you to shorten one of them: the font size is fixed by the Regulation.
Own data or manufacturer template
If the manufacturer of the product has a template (section 4), the top of the panel shows Data of this product with two choices: Manufacturer template (the product shows the data of the template) or Own data for this product (the template does not change it) (the product keeps its own data). A line (Now applied) says what the product shows right now: the manufacturer template, its own data or nothing, for example when you removed the product from the template (choose Manufacturer template to link it again). The link Open the template opens the template. Data entered on the product always wins over the template.
The optional Producer address field holds the address of the producer: it is shown in small print under the label on the product page and in the email, and kept in the order records. If the product has combinations, the panel also contains the table of combinations (section 6).
4. Manufacturer templates
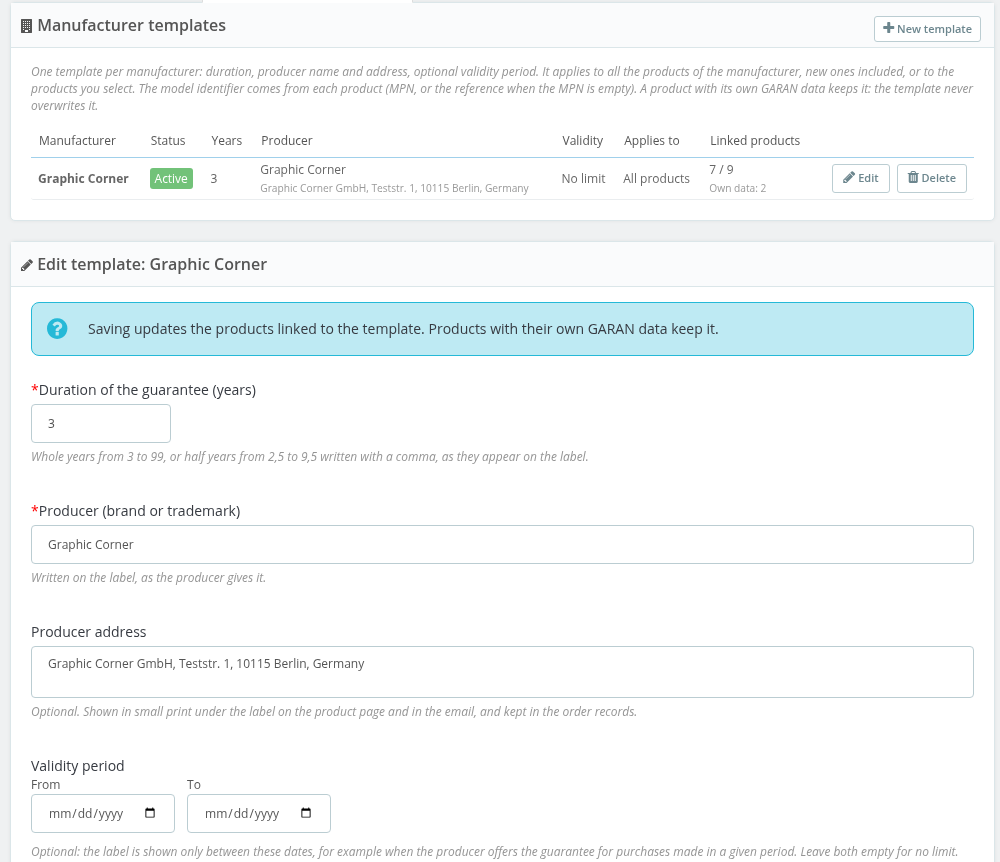
When a manufacturer offers the same guarantee on all its products you do not need to fill in every product: in the Manufacturer templates tab you enter the data once per manufacturer. Click New template and fill in:
- Manufacturer: the manufacturer, chosen among those of the PrestaShop manufacturers list. Manufacturers that already have a template are not listed.
- Duration of the guarantee (years): whole years from 3 to 99, or half years from 2,5 to 9,5 written with a comma.
- Producer (brand or trademark): as the producer gives it, it is the name written on the label.
- Producer address: optional.
- Validity period (From and To): optional. The label is shown only between these dates, for example when the producer offers the guarantee for purchases made in a given period. Leave empty for no limit.
- Criteria: to activate the template you must confirm that the producer offers the guarantee at no additional cost, for the entire good, for more than two years, and gave you this information.
- Status and Applies to: the template can be active or not, and apply to all the products of the manufacturer, also those added later, or only to the products you select.
Save and update the products applies the template to the linked products straight away. The model identifier (Model identifier) comes from each product: the MPN, or the reference when the MPN is empty (the MPN exists from PrestaShop 1.7.7), and it is updated when you change the MPN or the reference of the product and save it. A product without an identifier, or with an identifier too long to fit next to the producer name on the label, shows no label until you fix it: the module lists them on the template page.
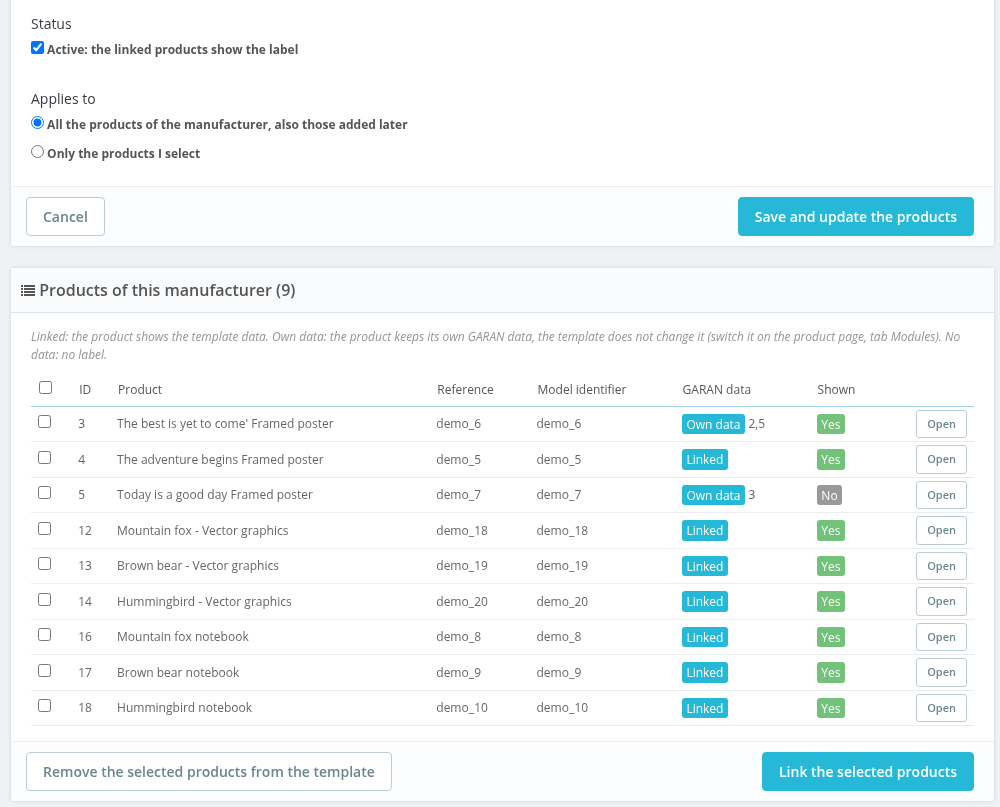
At the bottom of the template page, Products of this manufacturer lists the products (the first 300) with the state of their data: Linked (shows the data of the template), Own data (keeps its own), Removed (removed from a template that applies to all the products), No data, and whether the label is shown (Shown). With the buttons Link the selected products and Remove the selected products from the template you choose which products follow the template. A product removed from a template that applies to all the products stays out of it, also when the product or the template is saved again, until you link it again: with Link the selected products, by choosing Manufacturer template in its GARAN panel or with template in the CSV.
In the Summary tab the list Manufacturers without a template takes you to a new template in one click (Create a template). Only producers that offer a commercial guarantee of durability of more than two years need one: the others can stay as they are.
5. CSV import and export
For a large catalogue you can export and import the GARAN data as a CSV file, in the CSV import and export tab.
Export
The export holds the GARAN data of the current shop, one row per product or combination, with a semicolon as separator. Choose Products with GARAN data, or All products, to fill in, or download the template file with Download the template. The columns are:
id_product;id_product_attribute;reference;ean13;mpn;product_name;data_source;active;years;producer;model;producer_address
- data_source:
product(own data of the product or combination, the default),template(links the product to the template of its manufacturer; on a multistore installation the manufacturer needs a template in every shop of the selected context) orremove(deletes the GARAN data; if the manufacturer has a template that applies to all the products, the product also leaves that template). - active: 1 or 0. years: 3 to 99, or 2,5 to 9,5. product_name is ignored on import. The mpn column exists only from PrestaShop 1.7.7.
Import, in two steps
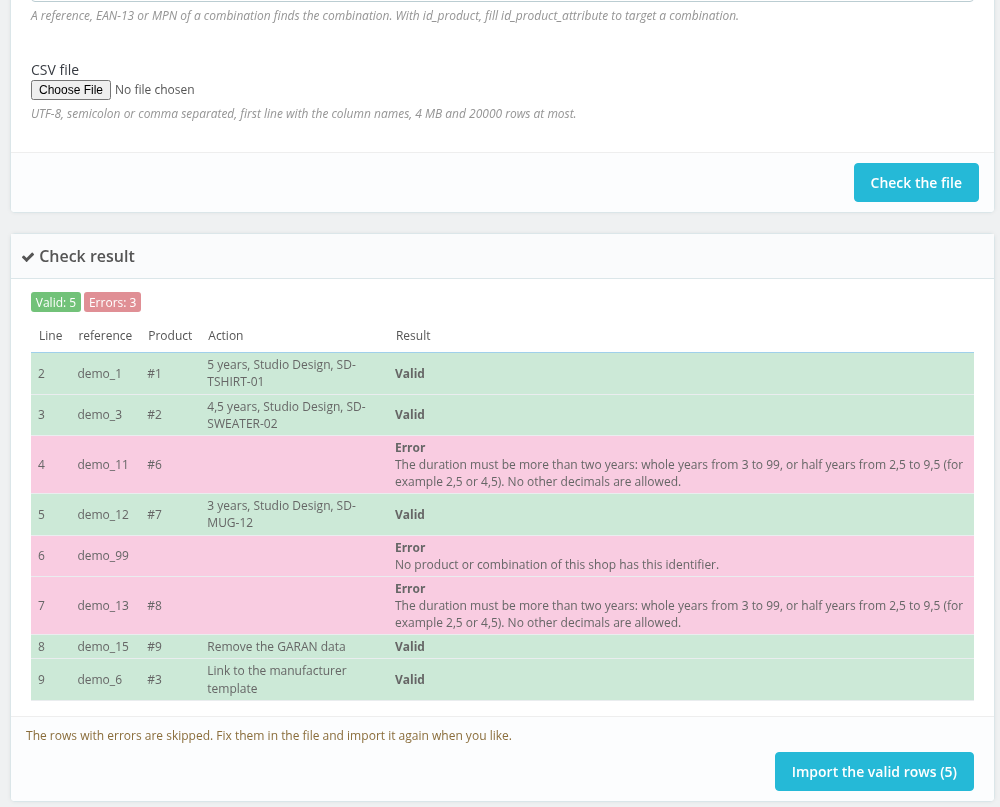
- Check the file. Choose how to find the products (Find products by: id_product, reference, ean13 or mpn; a reference, EAN-13 or MPN of a combination finds the combination, while with id_product you target a combination by filling id_product_attribute) and upload the file: UTF-8, separated by semicolons or commas, with the column names in the first line, 4 MB and 20000 rows at most. The module checks every row and shows it with its result (Valid or Error with the explanation). It writes nothing.
- Import the valid rows. The valid rows are written together: if a write fails, nothing is kept. Rows with errors are skipped: fix them in the file and import it again whenever you like.
6. Different labels per combination
A product with combinations can have a different guarantee for each combination, for example a more expensive version with a longer guarantee. In the GARAN panel of the product page you find the Combinations table, with one row per combination and a menu:
- Same as the product: the combination shows the label of the product (or of its template). This is the default.
- Own data: you fill in Years, Producer and Model identifier of the combination.
- No label: the combination shows no label, because it has no guarantee of durability.
On the product page the label follows the combination chosen by the customer: it changes when the customer changes size or colour. The cart, the payment step, the confirmation email and the order records use the combination that was ordered. In the CSV a combination is targeted with the id_product_attribute column.
7. Look and positions
The Appearance and positions tab sets how and where the GARAN label and the notice appear on the product page. Cart, payment step, footer and email are set in Settings.
The form of the label
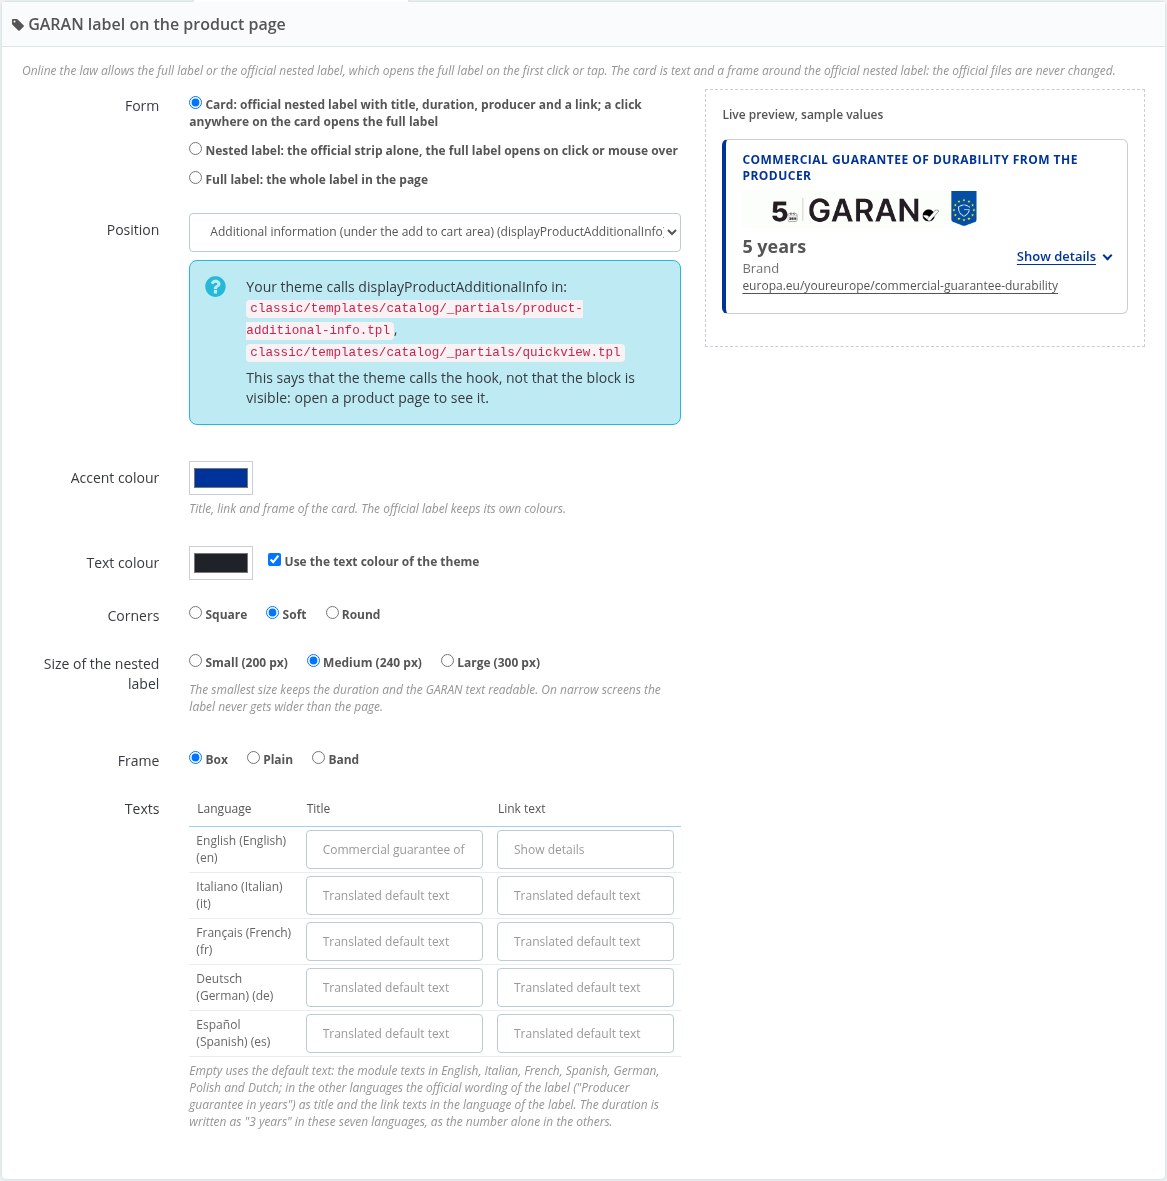
In Form choose among three forms:
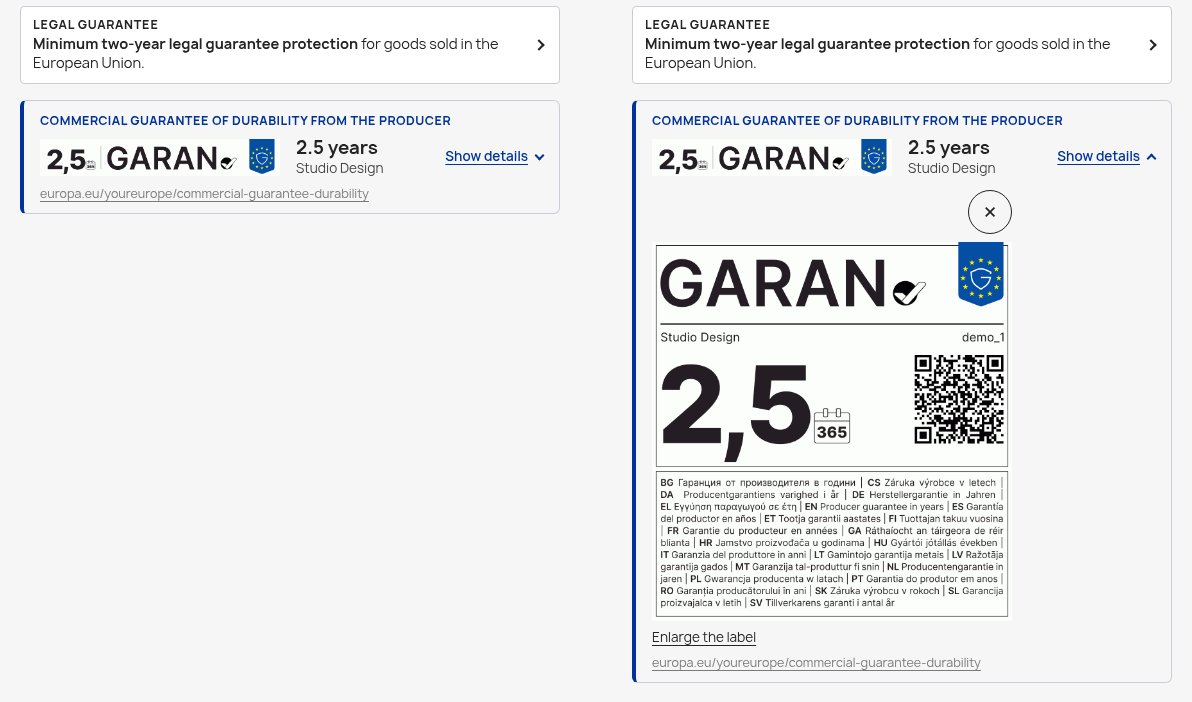
- Card: a box with the official strip of the label (the reduced version, called nested), the title, the duration, the producer and a Show details link. A click or a tap anywhere on the box, or a key on the keyboard, opens the full label, which can be enlarged. The link to the europa.eu page on guarantees of durability always stays visible.
- Nested label: the official strip alone; the full label opens on click or on mouse over.
- Full label: the whole label in the page.
On new installations the default form is the card. If you update from an earlier version, the look stays the one you had.
The look of the card
The card is text and a frame around the official files: the label itself is never changed. You can set:
- Accent colour: the colour of the title, the link and the frame. The official label keeps its own colours.
- Text colour: the colour of the text, or Use the text colour of the theme.
- Corners: Square, Soft or Round.
- Size of the nested label: Small (200 px), Medium (240 px) or Large (300 px). The smallest size keeps the duration and the GARAN text readable; on narrow screens the label never gets wider than the page.
- Frame: Box (a border with a coloured bar on the left), Plain (no frame) or Band (a strip with a light background and a coloured line on top).
- Texts: the title and the link text for each shop language, up to 120 characters. If you leave them empty the module uses its own texts, translated in English, Italian, French, Spanish, German, Polish and Dutch. In the other languages the title is the official wording of the label in your language (in English, “Producer guarantee in years”), the link texts are in the language of the label and the duration is written as a number only.
On the right, Live preview, sample values shows the result with sample values as you change the settings. Click Save at the bottom of the page to apply.
The position
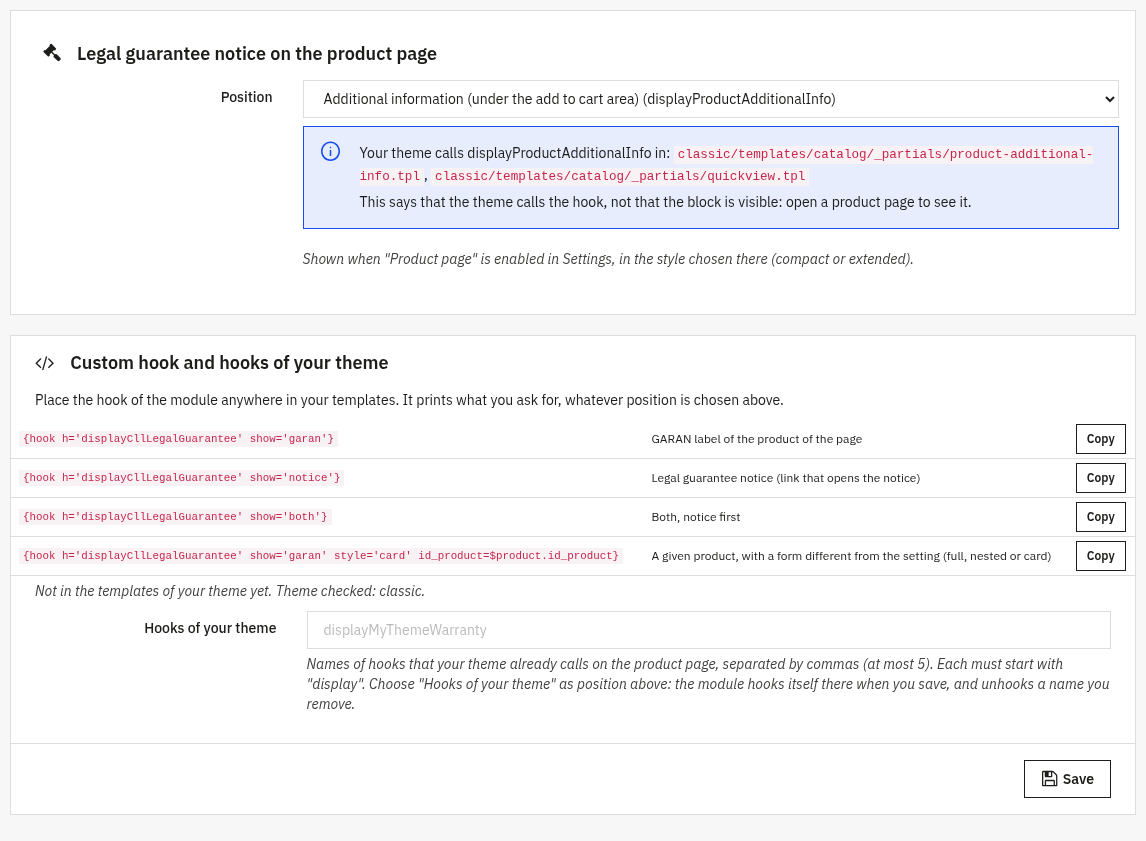
The label and the notice each have their own position on the product page (Position, in the two panels). The positions depend on the PrestaShop version:
- PrestaShop 1.7 and later: under the product pictures (
displayAfterProductThumbs), under the price (displayProductPriceBlock), next to the Add to cart button (displayProductActions), in the additional information under the Add to cart area (displayProductAdditionalInfo), in the reassurance block (displayReassurance), at the bottom of the product page (displayFooterProduct). - PrestaShop 1.6: under the short description (
displayRightColumnProduct), under the price, under the Add to cart button (displayProductButtons), at the bottom of the product page. - Hooks of your theme: the hooks that your theme already calls (see below).
- None: the module prints nothing by itself and you only use the
displayCllLegalGuaranteehook that you write in your template.
The theme check
Under each position the module reads the templates of the theme in use and tells you whether the chosen hook appears in them: Your theme calls displayProductAdditionalInfo in followed by the files, or was not found in the templates of your theme with the suggestion to use the hook of the module. The check says that the theme calls the hook, not that the block is visible: open a product page to see it. If the templates of the theme cannot be read, the check is skipped.
The hook of the module and the hooks of your theme
If your theme does not have the position you need, write the hook of the module in a template of your theme. The Custom hook and hooks of your theme panel lists ready snippets, each with a Copy button:
{hook h='displayCllLegalGuarantee' show='garan'}
{hook h='displayCllLegalGuarantee' show='notice'}
{hook h='displayCllLegalGuarantee' show='both'}
{hook h='displayCllLegalGuarantee' show='garan' style='card' id_product=$product.id_product}
show='garan'prints the GARAN label of the product of the page,show='notice'the link that opens the legal guarantee notice,show='both'both, notice first.- The last snippet shows the label of a given product with a form different from the setting (
full,nestedorcard). On PrestaShop 1.6 the product variable is$product->id. - Under the snippets the module tells you whether the hook already appears in the templates of your theme.
If your theme already calls a hook of its own on the product page, type it in the Hooks of your theme field (up to 5 names separated by commas, each must start with display), choose Hooks of your theme as the position and save: the module hooks itself to that hook, and unhooks a name you remove.
8. Customising the look
Colours, corners, size and frame of the card are already set in the Appearance and positions tab (section 7). If your theme needs more, add rules to the custom.css file of the theme, so that a module update does not erase them. In PrestaShop 1.7 and later the file is themes/your-theme/assets/css/custom.css; on PrestaShop 1.6 use the stylesheet of your theme. All the classes start with the prefix cll-lg-.
The main classes
.cll-lg-card: the box of the GARAN label on the product page. The choices made in Appearance are classes:.cll-lg-card--frame-card,--frame-plain,--frame-band(frame),--corners-square,--corners-soft,--corners-round(corners),--size-small,--size-medium,--size-large(size).- The parts of the card:
.cll-lg-card__head(the row you click),.cll-lg-card__title,.cll-lg-card__strip(the official strip),.cll-lg-card__years,.cll-lg-card__producer,.cll-lg-card__more(the “Show details” link),.cll-lg-card__panel(the open full label),.cll-lg-card__close,.cll-lg-card__enlarge,.cll-lg-card__addressand.cll-lg-card__eu(the link to the europa.eu page). .cll-lg-garan--card: the container of the card, useful for the spacing around it..cll-lg-trigger: the compact block of the notice, with.cll-lg-trigger__titleand.cll-lg-trigger__text..cll-lg-linkis the notice as a link (footer and header),.cll-lg-noticeis the extended notice on the dedicated page,.cll-lg-dialogis the window that opens it and.cll-lg-garan-listis the list of labels in the cart and in the payment step.
The CSS variables
--cll-lg-accent: the colour of the title, the link and the frame of the card.--cll-lg-accent-soft: the light tint that theBandframe uses as background.--cll-lg-text: the text colour of the card. It exists only if you cleared Use the text colour of the theme.
The module writes the variables directly on the card (with the values chosen in Appearance), so in your custom.css they need !important:
/* accent colour of the card */
.cll-lg-card { --cll-lg-accent: #0b6b3a !important; }

/* text colour of the card */
.cll-lg-card { --cll-lg-text: #222222 !important; }

/* more room around the card and a slightly larger title */
.cll-lg-garan--card { margin: 24px 0; }
.cll-lg-card__title { font-size: 13px; }

/* compact notice block with the corners of your theme */
.cll-lg-trigger { border-radius: 8px; }
.cll-lg-notice__img), the strip (.cll-lg-card__img) and the full label (.cll-lg-card__label) remain the ones published by the Commission: no colour filters, crops or replacements. Change the frame, the texts around it and the spacing, not the files. If your theme compresses and caches the CSS, your changes appear when the CSS cache is renewed.9. Business customers
The notice and the GARAN label are information for consumers. In Settings, in the Business customers panel, you can choose not to show them to business customers by ticking Do not show the notice and the GARAN labels to business customers. The option is off by default. Visitors who are not logged in, and customers who order as guests, are always treated as consumers and see everything.
In Recognised as business when choose the criteria: one is enough.
- The customer belongs to one of the customer groups you tick.
- The customer account has a company name.
- The address has a VAT number (for an order: its invoice address).
- The customer is in the B2B group of the module B2B VAT (
cll_b2b_vat). The entry is available when that module is installed; this module works without it.
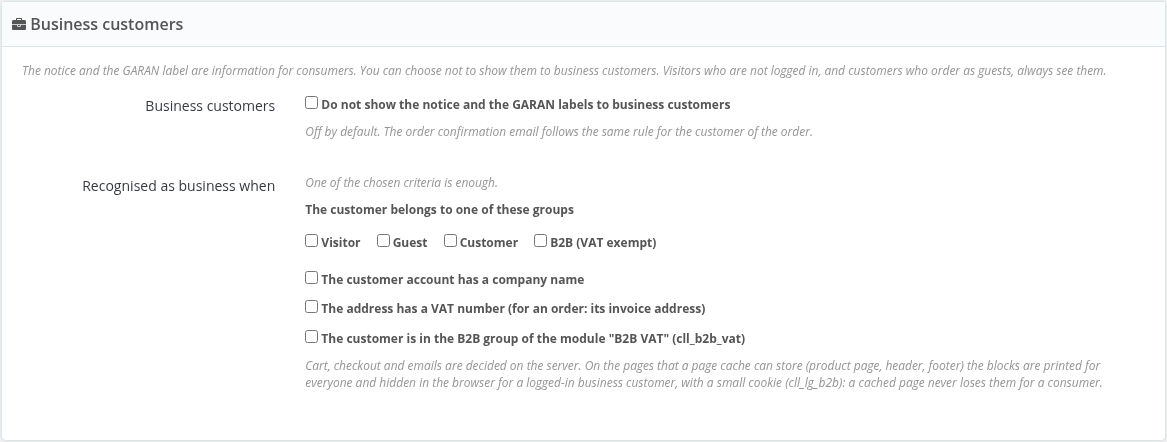
How it works: in the cart, in the payment step and in the confirmation email the decision is taken by the server, on the customer of the order. On the pages that a cache can store (product page, header, footer) the blocks are printed for everyone and the browser hides them from a logged-in business customer, with a small cookie (cll_lg_b2b): a cached page never loses the blocks for a consumer. In the order records (section 10) a business customer appears as Business (blocks hidden).
10. Order records
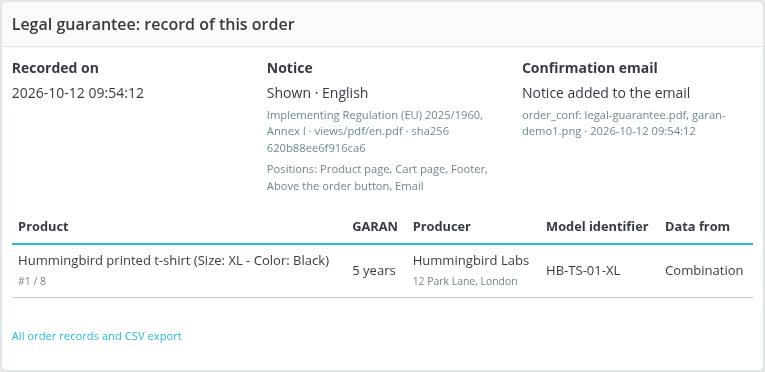
For every order the module records what it showed to the customer: the language, the version and the file of the notice, the positions in use, the GARAN data of each product and combination with where it came from (product, template or combination), and whether the confirmation email carried the notice and the attachments. Recording never stops an order.
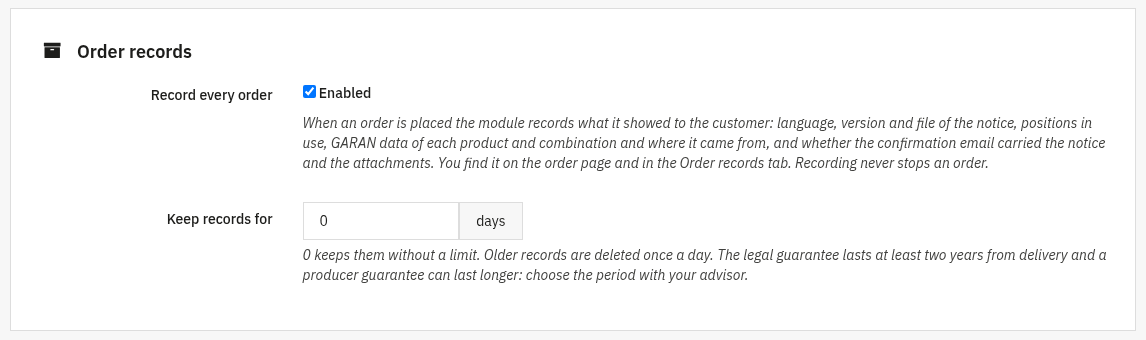
In Settings, in the Order records panel, Record every order switches recording on and Keep records for sets how many days to keep them: 0 means without a limit, and older records are deleted once a day. The legal guarantee lasts at least two years from delivery and a producer guarantee can last longer: choose the period with your advisor.
Where to find it:
- On the order page in the back office, in the Legal guarantee: record of this order panel.
- In the Order records tab: the list of all recorded orders, which you can filter by date (From and To), with the Export CSV button.
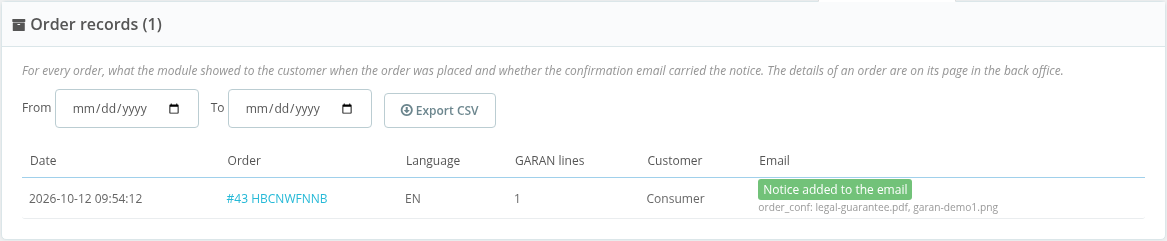
The email column shows the outcome: Notice added to the email, Not added: business customer, Email option off or No email with the notice yet. On PrestaShop 1.6, where modules cannot attach files to the confirmation email, the outcome of the second email with the attachments is shown too.
11. Text scanner
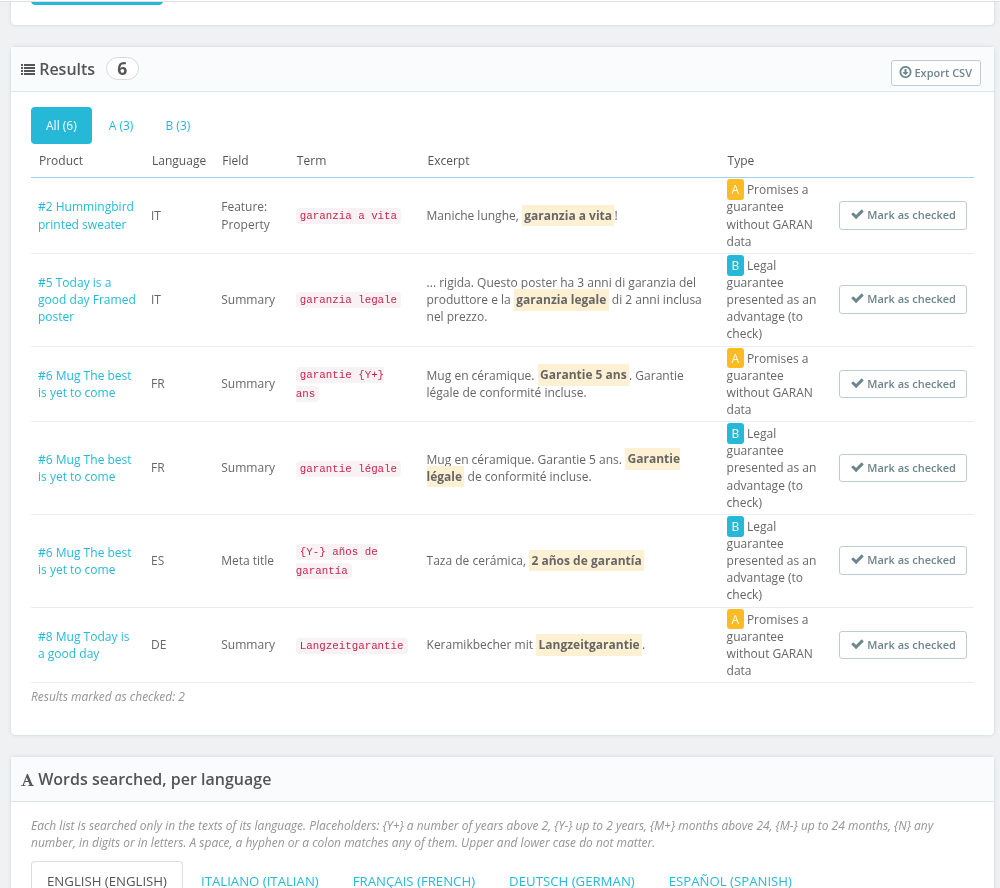
The scanner shows you where to look in your product texts. A result is not a verdict and the scanner does not make the shop compliant: read the text and decide. It searches the active products of the shop, in every active language, in name, summary, description, meta title, meta description and feature values, and points out two things:
- A, Promises a guarantee without GARAN data: the text talks about a guarantee of the producer, of durability, for life or longer than the two legal years, but the product and its combinations have no valid GARAN data. There are two ways out: fill in the GARAN data (product page, manufacturer template or CSV) or change the text.
- B, Legal guarantee presented as an advantage (to check): wordings such as “2 years warranty” or “legal guarantee included” used as a selling point. Directive 2005/29/EC on unfair commercial practices, Annex I, point 10, forbids presenting rights given to consumers by law as a distinctive feature of the offer. Check how the text presents them.
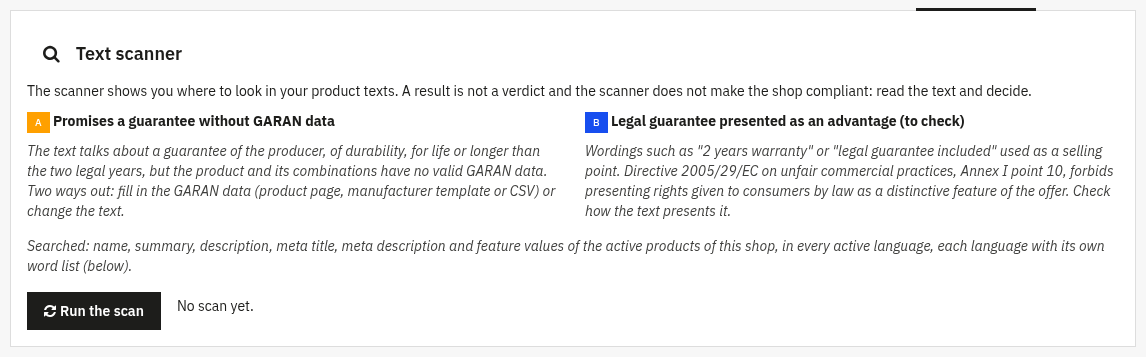
Click Run the scan: the scan runs in blocks, with its progress, the results appear as soon as it ends and the page remembers the last scan. In the Results you can filter by type (All, A, B) and each row shows the product (with a link to its page), the language, the field, the word found and an excerpt with the word highlighted. Mark as checked removes the result from the next scans until the text of that field changes. Export CSV exports the results. On a multistore installation the scan runs on the shop of the selected context.
The words per language
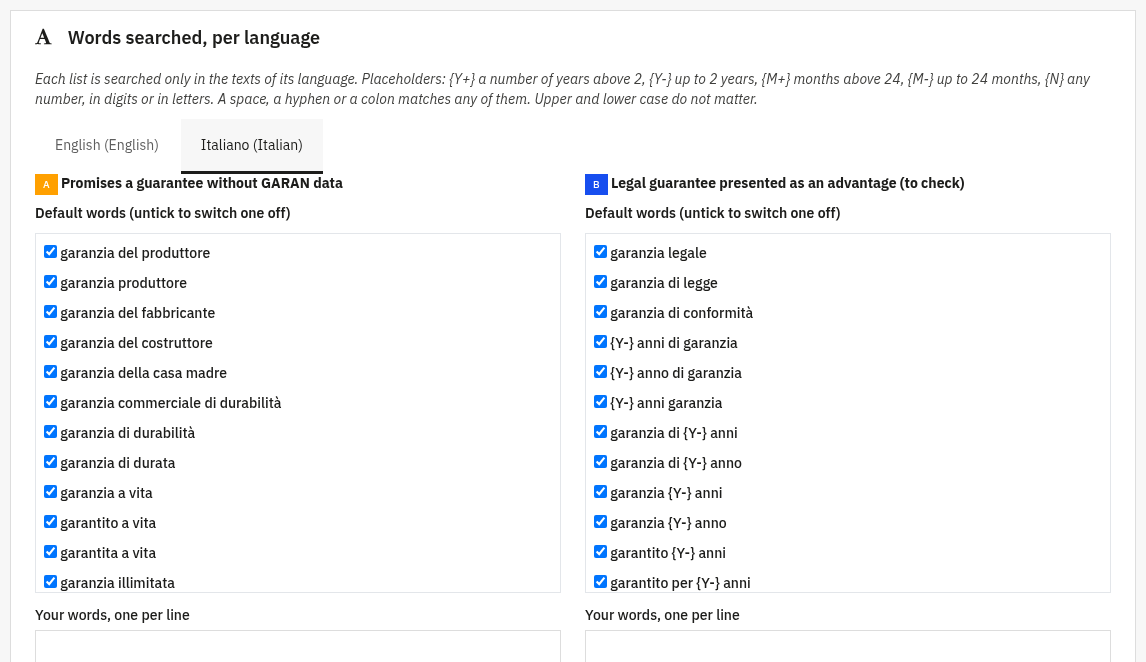
In Words searched, per language each shop language has its own lists, one per type, and each one searches only the texts of its own language. For English, Italian, French, Spanish and German they are already prepared: you can switch off a default word, add your own in Your words, one per line (up to 80 characters per entry and 100 entries per list) and go back to the starting lists with Restore the defaults of this language. For the other languages the module has only the wording of the official notice and label, which alone finds little: add the words of your language.
In the words you can use placeholders: {Y+} a number of years above 2, {Y-} up to 2 years, {M+} months above 24, {M-} up to 24 months, {N} any number, in digits or in letters. A space, a hyphen or a colon matches any of the three. Upper and lower case do not matter.
12. What your customers see
Product page
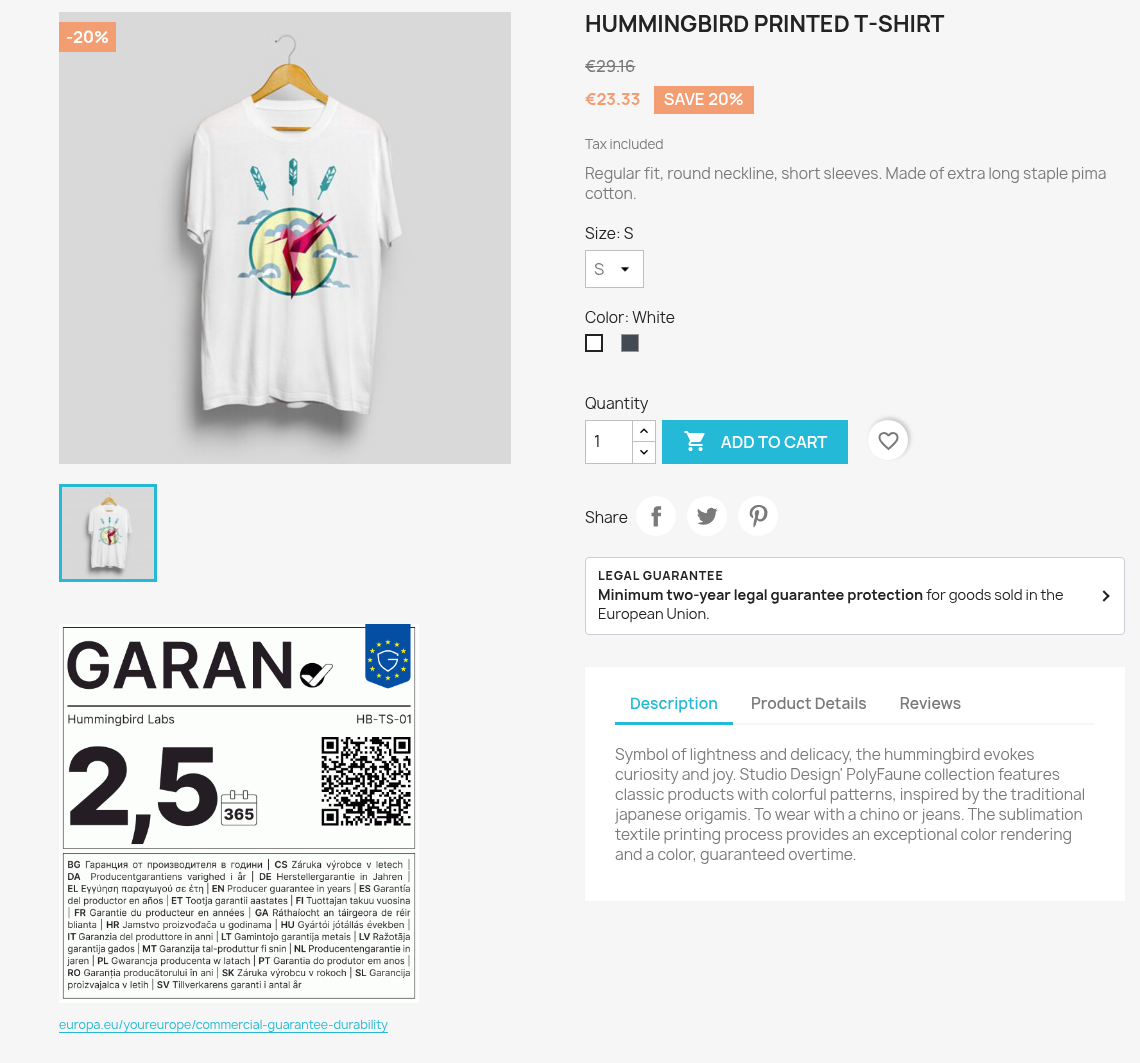
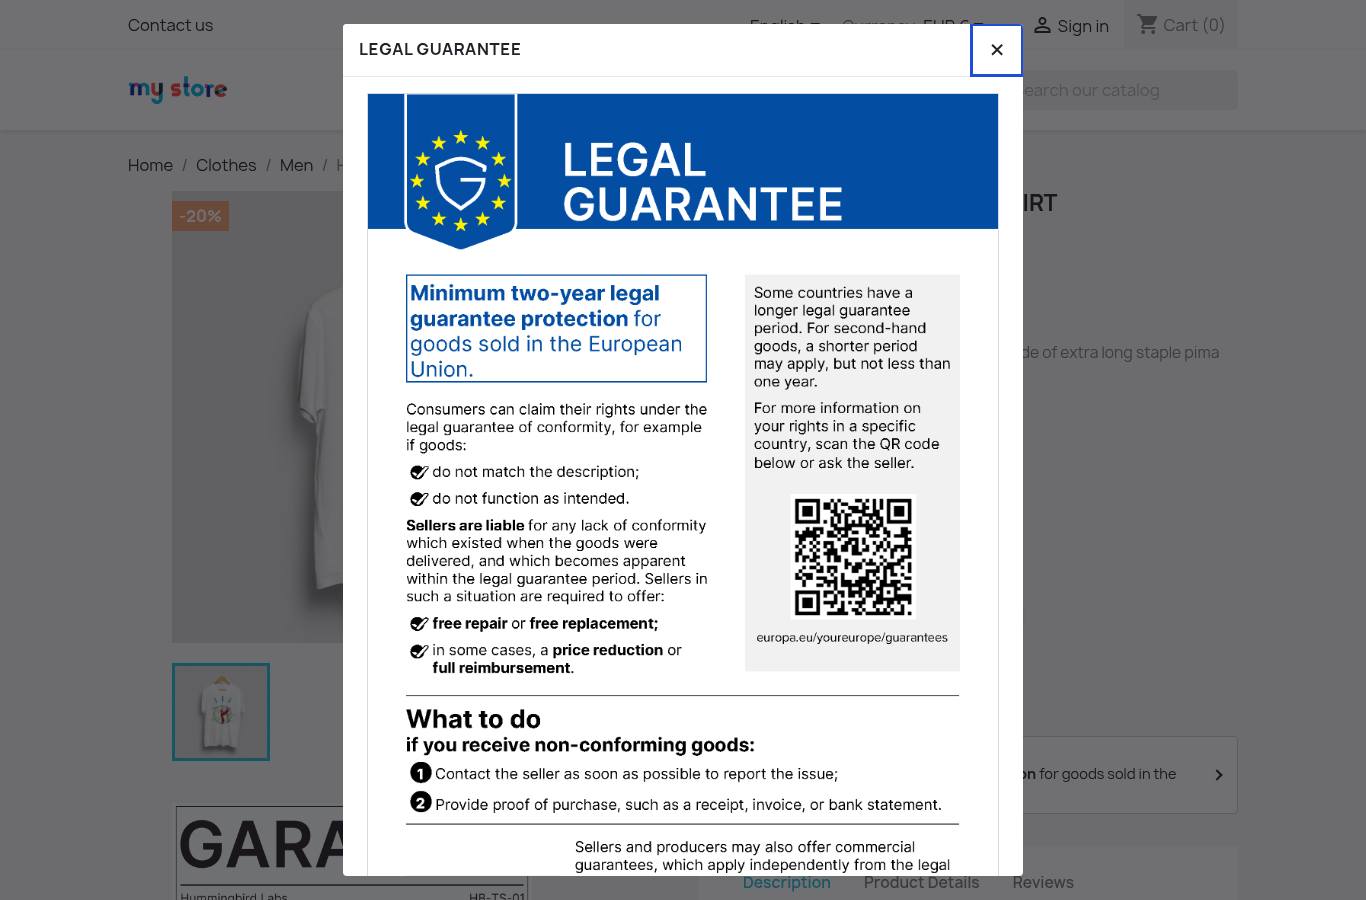
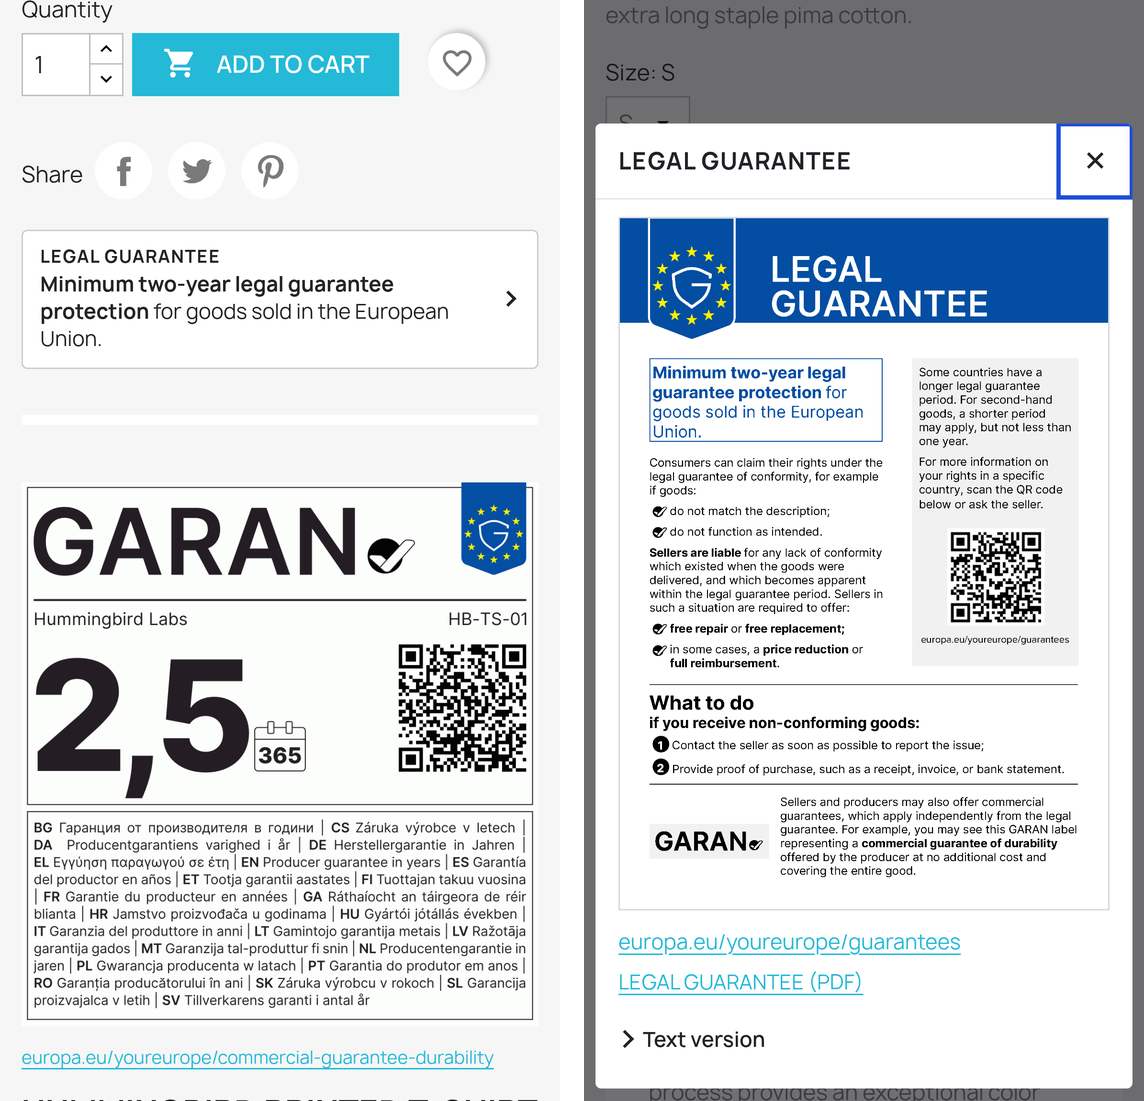
The compact block shows the official heading of the notice. The GARAN label of the product appears in the position chosen in Appearance and positions (section 7), as a card, an official strip or the full label, with the link to the European Commission page on commercial guarantees of durability. The screenshots below show the strip under the pictures; the card is in section 7.
Cart and payment step
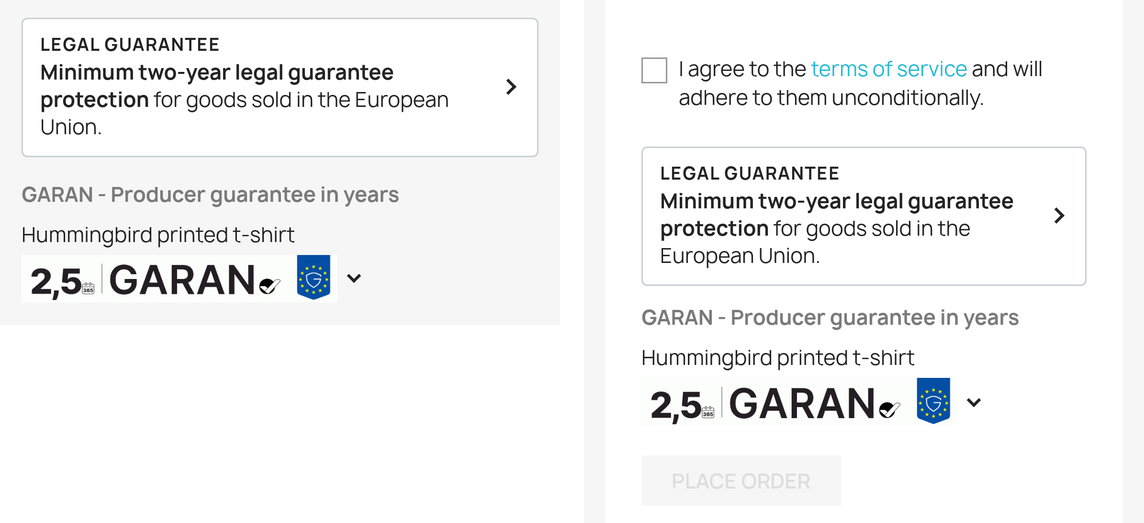
The notice and the GARAN labels of the products in the cart are shown again in the cart and in the payment step, before the order is placed: at the top of the step, or directly above the button that places the order when the option Checkout: directly above the order button is on. Each nested label opens the full label.
Footer link and dedicated page

Order confirmation email
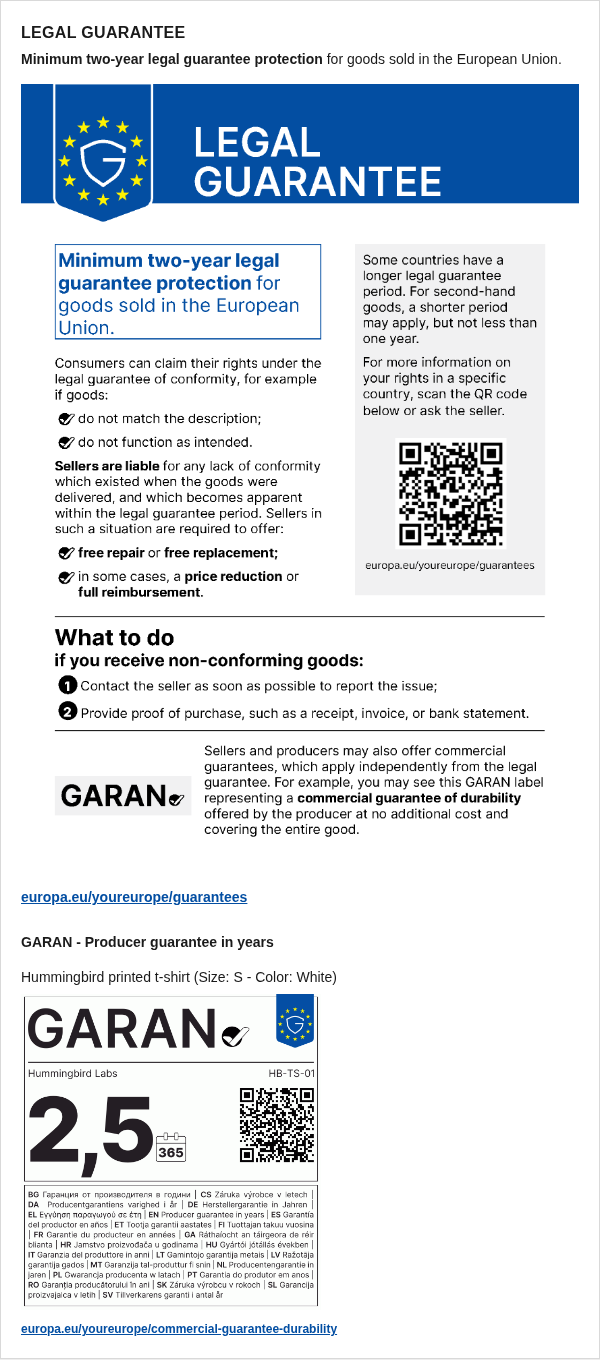
At the end of the order confirmation email: the notice in the language of the order, the link to Your Europe, the GARAN labels of the ordered products, and the official PDF of the notice attached.
13. Check that it works
- Open a product page and click the compact block: the full notice opens in the language of the page. Press Esc to close it.
- Fill in the GARAN panel of a product and check the label on its product page.
- Add the product to the cart and go to the payment step: the notice and the GARAN label are shown before the button that places the order (Place order in the classic theme), at the top of the step or directly above the button, depending on the option.
- Place a test order and check the confirmation email: notice at the end, PDF attached, GARAN label of the product.
- Switch the shop language and repeat: each language shows its own official version.
- In Appearance and positions watch the live preview while you change colours and frame, then open a product page: a click on the card opens the full label, the close button closes it again.
- If the product has combinations, change size or colour on the product page: the label follows the combination.
- After a test order open the order page in the back office: the Legal guarantee: record of this order panel shows what the customer saw.
- In the Text scanner tab click Run the scan once to see where to look in your texts.
14. FAQ
Does the module make my shop compliant?
It shows the official notice and label published by the European Commission, unchanged, where you choose. Whether your positions and your product data meet your obligations is for you to assess, ideally with your legal advisor.
Can I edit the text of the notice?
No. The notice is an official document and is shown as published. You can only replace the heading of the compact link with your own words.
Can I enter half years in the GARAN label?
Yes, from 2,5 to 9,5 years, written with a comma as on the label: the Commission guidelines allow half years and no other decimals. Longer durations are whole years, up to 99, because a longer value with a comma does not fit in the number field of the label at the prescribed size.
I sell to customers in Germany.
German law (§ 312j (2) BGB) asks for the information of the GARAN label directly before the order is placed. Keep Checkout: directly above the order button on: it is switched on at installation when your shop has German as a language or delivers to Germany. As for every position, check your setup with your legal advisor.
My shop is in a language that is not an official EU language.
Choose the version to show in Version for other languages, or pick a version for each shop language in Language versions.
I also have a physical shop.
For a physical shop the notice must be printed at least in A4 format. The settings page links to the print files published by the Commission, in colour and in black and white, for all languages.
Do I need to edit my theme?
No. The module uses standard PrestaShop hooks: it works with the classic theme and Hummingbird, and with themes that keep those hooks. If your theme does not show one of the positions, the dedicated page, the footer link and the email keep working. Some themes hide the header bar on phones: keep the footer link on.
Does it slow down my shop?
No call to external services is made while your shop pages are displayed. The official files are part of the module, and each GARAN label image is drawn once and stored in img/cll_legalguarantee/.
Does it work with multistore?
Yes. Settings and GARAN data can differ from one shop to another: save them in the context of the shop, of a group or of all shops.
My theme does not show the position I chose.
Open Appearance and positions: under the position the module tells you whether the theme calls that hook. If it does not find it, choose another position, write the hook of the module in the template of your theme ({hook h='displayCllLegalGuarantee' show='both'}) or type in the Hooks of your theme field a hook that your theme already calls. The dedicated page, the footer link and the email keep working in any case.
Can I change the colours and the look?
Yes. Colour, text, corners, size and frame of the card are set in Appearance and positions; for the rest add rules to the custom.css of your theme (section 8). The official files of the notice and of the label must not be altered.
Does the text scanner make my shop compliant?
No. It shows where to look: texts that promise a guarantee without GARAN data, and texts that present the legal guarantee as an advantage of the offer. Read the text and decide, ideally with your legal advisor.
Do I have to hide the notice from business customers?
That is your decision: the option is off by default. If you switch it on, the module does not show the notice and the labels to the customers recognised as business by the criteria you choose (group, company name, VAT number). Check your choice with your legal advisor.
Does it work with PrestaShop 1.6?
Yes, the module works from 1.6.1 to 9, with PHP 7.1 or later. On PrestaShop 1.6 the confirmation email does not accept attachments from modules: the PDF and the label images go in a second email right after the order, and the block of the payment step stays at the top of the step, because the order button is on the page of the payment module.